 how-to
Well Pump Pressure Switch: How It Works
Table of Contents
- What Is a Well Pump Pressure Switch?
- How a Well Pump Pressure Switch Works
- Common Well Pump Pressure Switch Settings
- Bad Well Pump Pressure Switch Symptoms
- Well Pump Pressure Switch Troubleshooting
- Well Pump Pressure Switch Replacement
- Safety and When to Call a Professional
- Frequently Asked Questions
Last Updated: October 15, 2026
What Is a Well Pump Pressure Switch?
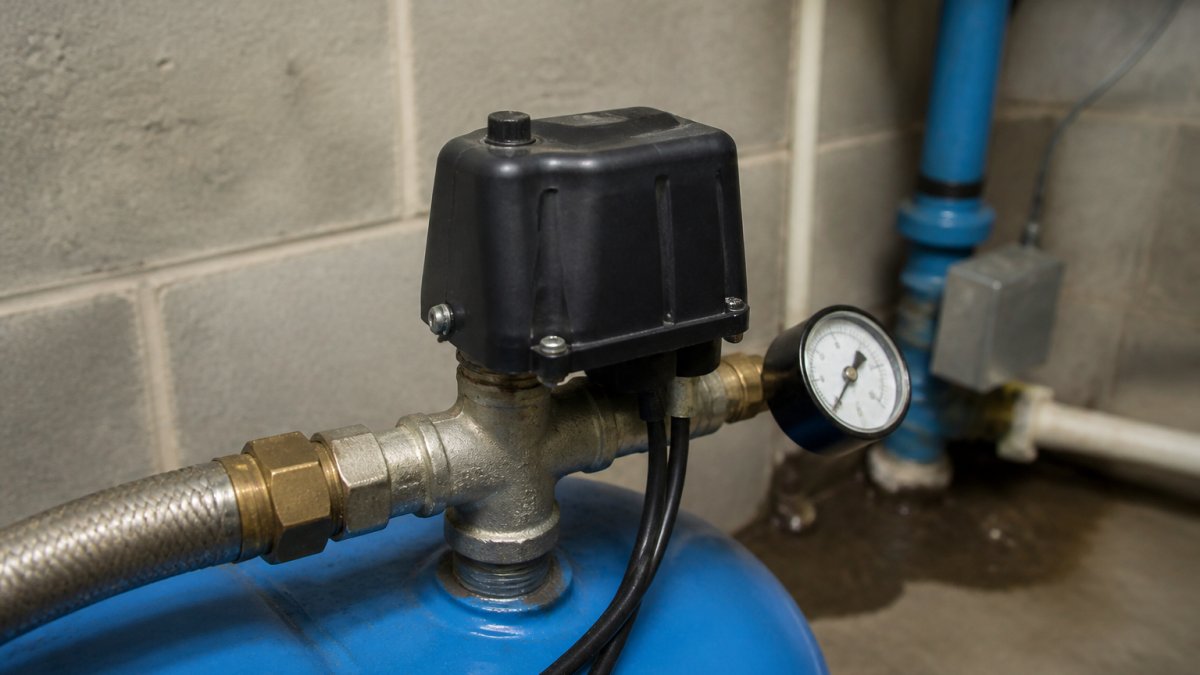
A well pump pressure switch is an electrical device that automatically turns your pump on and off based on water pressure levels in your system. Think of it as the brain of your well pump setup.
The switch sits between your pump and your pressure tank. When water pressure drops below a certain point, the switch closes an electrical contact, turning the pump on. When pressure rises to the target level, the switch opens that contact, shutting the pump down.
Most homeowners never think about their pressure switch until something goes wrong. But understanding how it works helps you spot problems early and know when to call a professional.
The pressure switch is different from the pressure tank. The tank stores water under pressure. The switch controls when the pump runs. Both work together, but they do different jobs.
How a Well Pump Pressure Switch Works
The switch uses a simple mechanical principle: a spring-loaded diaphragm responds to pressure changes. Inside the switch, water pressure pushes against one side of the diaphragm. A calibrated spring pushes back from the other side. When pressure overcomes the spring force, the diaphragm moves and triggers electrical contacts.
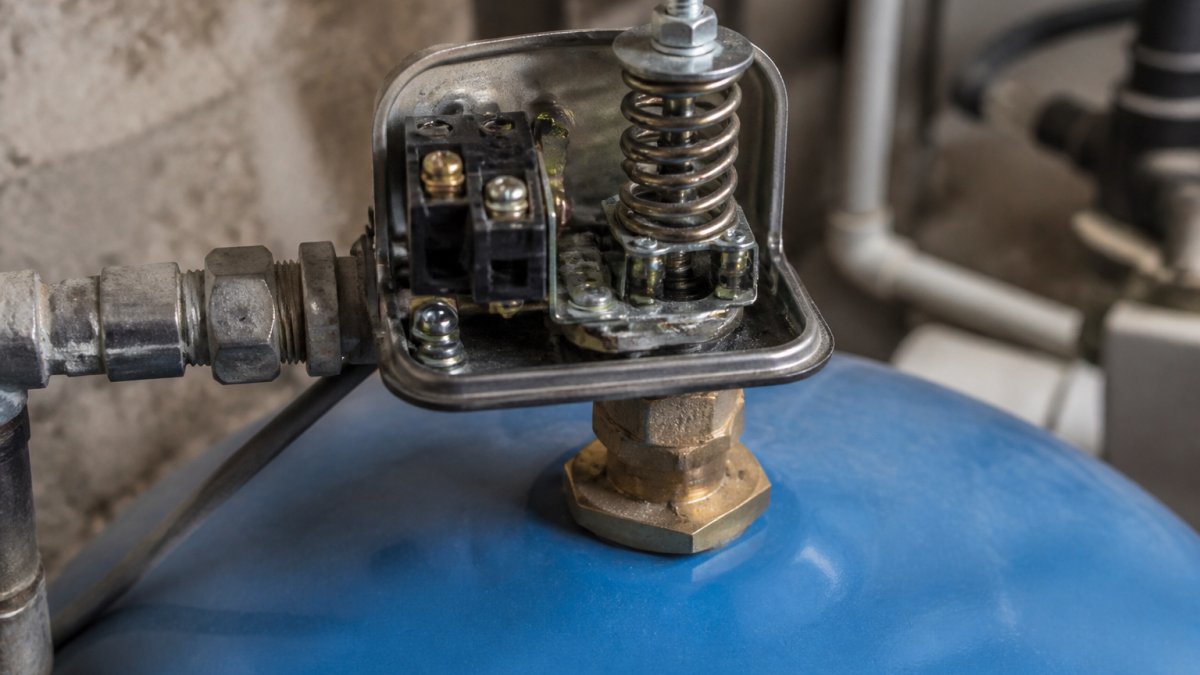
Here's the basic sequence:
- Low pressure state: Water pressure drops as you use water
- Pressure falls below cut-in point: The spring pushes the diaphragm inward
- Electrical contact closes: This completes the circuit to the pump motor
- Pump starts: Water flows into the tank, raising pressure
- Pressure rises above cut-out point: The diaphragm moves outward against the spring
- Electrical contact opens: The circuit breaks, stopping the pump
- Pump stops: Pressure stabilizes in the tank
The switch contains two electrical contacts: one for the pump motor and one for a safety circuit. The safety contact prevents the pump from running continuously if something fails. Without this protection, a broken switch could burn out your pump motor.
Cut-In and Cut-Out Pressure
These two pressure levels define when your switch turns the pump on and off.
Cut-in pressure is the lower threshold. When tank pressure drops to this point, the switch closes and starts the pump. Cut-in typically ranges from 20 to 40 PSI depending on your system setup.
Cut-out pressure is the upper threshold. When tank pressure rises to this point, the switch opens and stops the pump. Cut-out typically ranges from 40 to 60 PSI.
The difference between these two values is called the pressure differential. A typical differential is 20 PSI. For example, a 30/50 PSI switch cuts in at 30 PSI and cuts out at 50 PSI.
If the differential is too small, your pump cycles on and off constantly. This rapid cycling wastes energy and shortens pump life.
Pressure Tank Relationship
The pressure tank and pressure switch are partners in your water system. The tank stores pressurized water between pump cycles. The switch controls when the pump refills that tank.
Here's how they work together:
- Tank volume determines how long water stays available before pump restarts
- Switch settings determine when the pump refills the tank
- If the tank is too small, the pump cycles frequently even with a good switch
- If the tank is too large, the switch may never reach cut-out pressure
The tank also contains a rubber bladder or diaphragm that separates air from water. This air chamber is precharged to a specific PSI before the system fills with water. Tank precharge pressure affects how your switch behaves.
If precharge is too low, the tank compresses too much, and the pump cycles more often. If precharge is too high, water pressure may not reach cut-out before the tank fills completely. Most tanks are precharged to about 2 PSI below the switch cut-in pressure.
Common Well Pump Pressure Switch Settings
Different households need different pressure settings based on their specific needs and plumbing layout.
20/40 PSI is the most common setting for residential wells. Cut-in occurs at 20 PSI, cut-out at 40 PSI. This works well for:
- Single-story homes with modest water demand
- Systems with adequate tank volume
- Homes where water pressure around 40 PSI is acceptable
30/50 PSI suits homes that need more pressure or have longer pipe runs to upper floors. Cut-in at 30 PSI, cut-out at 50 PSI. Use this for:
- Two-story homes or homes with basements far from the tank
- Systems serving multiple bathrooms simultaneously
- Situations where 40 PSI feels too low for showers
40/60 PSI provides the highest pressure for demanding applications. Cut-in at 40 PSI, cut-out at 60 PSI. Choose this for:
- Large homes with multiple simultaneous water users
- Systems with long horizontal pipe runs that lose pressure
- Homes with pressure-sensitive appliances like washing machines
Your well pump pressure switch setting should match your system's tank size and your household's water demands. Undersizing the pressure creates weak showers and slow fills. Oversizing the pressure stresses pipes and fixtures.
Never guess at the right setting. A professional from England's Plumbing & Heating can measure your current system and recommend the ideal pressure range for your specific home and water usage patterns.
Bad Well Pump Pressure Switch Symptoms
A failing pressure switch produces telltale signs that alert you to problems.
Rapid pump cycling is the most common symptom. The pump starts and stops every few seconds instead of running for a minute or two. This rapid cycling wastes electricity and stresses the pump motor. Causes include:
- Switch cut-in and cut-out points too close together
- Leaks in the pressure tank or plumbing
- Waterlogged pressure tank with failed bladder
- Switch contacts sticking or failing
No water pressure means the switch isn't signaling the pump to start. You turn on a faucet and nothing happens. The pump doesn't run at all. This indicates:
- Switch electrical contacts stuck in open position
- Broken wiring between switch and pump motor
- Switch diaphragm ruptured or stuck
Constant pump running means the switch never signals the pump to stop. Water runs continuously even when all faucets are closed. This suggests:
- Switch contacts stuck in closed position
- Pressure never reaches cut-out point
- Tank precharge too high, preventing normal pressure rise
Low water pressure at the tap occurs when the pump runs but pressure stays below normal. Showers feel weak. Faucets dribble. This can mean:
- Switch cut-out pressure set too low
- Leaks in tank or plumbing reducing pressure
- Pump wearing out and losing capacity
Pressure gauge fluctuation shows erratic pressure readings on a gauge. Numbers jump around instead of staying steady. This indicates:
- Switch contacts bouncing or arcing
- Pressure tank precharge imbalance
- Diaphragm partially failed
Any of these symptoms warrant professional inspection. Don't ignore them hoping they'll resolve on their own. A small problem becomes expensive when it damages your pump motor or pressurizes your system dangerously.
Well Pump Pressure Switch Troubleshooting
Start by checking the simplest things first before assuming the switch has failed.
Check the pressure gauge. Most systems have a gauge mounted near the tank.
Listen to pump behavior. Does it cycle normally or rapidly? Normal cycling happens every few minutes depending on water use.
Test water pressure at a faucet. Open a cold water faucet fully. Feel the pressure.
Check for leaks. Walk around your tank and visible pipes looking for water drips.
Inspect the pressure tank. Tap it with a wrench and listen. A hollow sound indicates normal air cushion.
Look at the switch mounting. Is it tight or loose? A loose switch may not sense pressure correctly.
Check electrical connections. Are wires firmly connected to the switch terminals? Loose connections prevent the pump from starting. Tighten any loose connections.
If these checks don't solve the problem, the switch itself likely needs replacement.
Well Pump Pressure Switch Replacement
Replacing a pressure switch is a job many homeowners can handle, but it requires care and safety awareness.
Tools you'll need:
- Adjustable wrench
- Screwdriver (flathead and Phillips)
- New pressure switch (matching your current PSI rating)
- Teflon tape for threaded connections
- Pressure gauge to verify settings after replacement
Basic replacement steps:
- Turn off power to the pump at the breaker. This is critical for safety.
- Close the isolation valve between the pump and tank if your system has one. If not, you'll need to drain the tank partially.
- Unscrew the old switch from the tank connection using an adjustable wrench. The connection is usually a threaded port on top of the tank.
- Disconnect electrical wires from the old switch terminals. Note which wire connects to which terminal before removing them.
- Wrap new switch threads with Teflon tape to prevent leaks.
- Screw in the new switch hand-tight, then snug it with a wrench. Don't over-tighten.
- Connect wires to the new switch terminals in the same configuration as the old one.
- Restore power and test the pump.
- Monitor pressure with a gauge to confirm cut-in and cut-out points match your system needs.
However, if your system is old, corroded, or you're uncertain about any step, call a professional. A mistake during replacement can damage your pump or create safety hazards.
Safety and When to Call a Professional
Well pump systems operate under pressure and involve electrical components. Mistakes can cause injury or equipment damage.
Call a professional if:
- You're uncomfortable working with pressurized systems or electricity
- The tank or pipes show rust, corrosion, or visible damage
- You smell gas or notice electrical burning smells near the switch
- The pump won't stop running even after you turn off power
- Water pressure exceeds 80 PSI (dangerous for plumbing fixtures and hoses)
- You need to adjust pressure settings and aren't sure what's safe for your system
Safety rules for DIY work:
- Always turn off power at the breaker before touching electrical connections
- Never work on a pressurized system without draining it first
- Wear safety glasses when working near pressurized connections
- If water sprays unexpectedly, step back and turn off the pump immediately
- Don't assume a switch is dead just because the pump won't start; electrical problems can mimic switch failure
England's Plumbing & Heating serves Chester County homeowners with well pump repairs, pressure switch replacement, and system diagnostics. Our team understands the unique challenges of private well systems in this area.
Some issues require professional expertise. Pressure tank failures, pump motor problems, or system redesigns need licensed plumbers. We're available to help when your DIY troubleshooting reaches its limits.
Understanding your well pump pressure switch helps you maintain reliable water pressure and spot problems early. The switch is a simple device doing a critical job: starting and stopping your pump at exactly the right pressure levels.
If you're experiencing pressure problems, rapid pump cycling, or you're unsure whether your switch is working correctly, England's Plumbing & Heating can help.
Frequently Asked Questions
What does a well pump pressure switch do?
A well pump pressure switch automatically turns your pump on and off based on water pressure in the tank. When pressure drops to the cut-in setting (typically 20 or 30 PSI), the switch activates the pump. When pressure rises to the cut-out setting (typically 40 or 60 PSI), it shuts the pump off. This automatic control prevents the pump from running constantly and maintains steady water pressure throughout your home.
What are the recommended pressure switch settings for a well pump?
Standard settings are 20/40 PSI, 30/50 PSI, or 40/60 PSI. The first number is the cut-in pressure (when the pump starts), and the second is the cut-out pressure (when it stops). Your tank precharge and system size determine which setting works best. Most residential systems use 30/50 PSI. Check your tank's precharge pressure and your system's water demand before adjusting. If you're unsure, contact a professional to ensure the settings match your specific setup.
How do you know if you have a bad pressure switch on a well pump?
Common signs include rapid cycling (pump turns on and off frequently), low water pressure that won't build, no water flow at all, or the pump running continuously without shutting off. You might also notice water spurting from faucets or hear unusual pump noise. If your pressure gauge shows pressure but water isn't flowing, or if the pump ignores pressure changes, the switch likely needs replacement. A professional can test the switch's electrical contacts and confirm whether it's faulty.
Is it safe to adjust or replace a well pump pressure switch yourself?
Adjusting the switch is risky because incorrect settings can damage your pump or tank. Replacement involves electrical work and requires the system to be powered down safely. If you lack experience with electrical systems or plumbing, professional installation is strongly recommended. Improper work can create safety hazards or lead to costly repairs. Contact a licensed plumber to handle pressure switch work safely and correctly.